2010 Altima Sedan Radiator Support Diagram
Joined
·
105 Posts
Discussion Starter · #1 · (Edited)
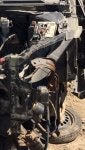
I am needing to remove and replace the mount that my front bumper reinforcement bolts to, as well as both upper radiator supports. One is missing and the other is bent beyond bending back.
I have included photos if you're not sure exactly what I'm talking about. As you can see the left front upper radiator support is conveniently removed for me. The right side is not though. To practice I went to my local junk yard and tried removing one from a car in the yard. I cannot figure out how in the heck I'm supposed to get this thing off short of cutting it with a sawzall. (Which I did try, and was still unsuccessful.) I'd consider cutting it off flush with the frame instead, but if I do that there is still some left inside that needs to come out to be able to insert the new one I bought.
The bumper reinforcement mounts are just beyond me too. I have tried prying all around the mount and cannot get it. Am I missing something? Is a torch required? I hope not, because torches aren't allowed in the junk yard near me and I cannot find any for sale besides direct from Nissan. I guess if I have to breakdown and get one direct from Nissan that's find but I still need mine off first.
This is on my 2010 Altima Coupe 3.5SR
I would greatly appreciate any advice or words of encouragement!
Thank you all
-

352.8 KB Views: 201
-

345.5 KB Views: 238
Joined
·
2,622 Posts
(shaking head sadly...)
Not to be mean at all but your skills are sadly lacking in everything portrayed here.
No car or year model given at all.
Not enough pics, we are supposed to tell you how to remove a rad support but with the one missing picced, well, useless there as well.
The bumper mount may well be one piece welded to the front frame horn, can't tell again due to not enough pics showing detail. And no car or year stops us from looking at things from that direction as well.
Some parts are part of welded subassemblies, you don't just pry them off; they are substantially mounted to guard against that.
Joined
·
105 Posts
Discussion Starter · #3 ·
(shaking head sadly...)
Not to be mean at all but your skills are sadly lacking in everything portrayed here.
No car or year model given at all.
Not enough pics, we are supposed to tell you how to remove a rad support but with the one missing picced, well, useless there as well.
The bumper mount may well be one piece welded to the front frame horn, can't tell again due to not enough pics showing detail. And no car or year stops us from looking at things from that direction as well.
Some parts are part of welded subassemblies, you don't just pry them off; they are substantially mounted to guard against that.
Sorry about that, I guess I didn't think to include it. I thought all 07-12 Altima's were the same setup as far as bumper support and upper radiator supports. That's my bad, I edited my post to include that info. (2010 Altima Coupe 3.5 SR)
The purpose of the upper radiator support picture was to show the "square" shaped hole that the support slides into. I have bought brand new ones online, I'm just not sure how this one pulled right out though, because I can't even think of a good way to break the tack welds on the passenger side. Although they appear very small, they are extremely strong.
As far as the mount on the frame goes, I am completely lost. The only thing I have been able to find online is included as an attachment. (Item 62243) While it doesn't exactly resemble the mount shape from the picture, intuitively it's the only thing that appears may go there. It's too dark outside to get more pictures but I've include two additional pictures from different angles on cars at the junk yard.
Thank you,
Marcus
-

331.5 KB Views: 204
-
119.5 KB Views: 224
-

87.5 KB Views: 305
Joined
·
2,622 Posts
Man, I got nothing.
Normally I could find a pic to show other things to go there but not on that one. You are missing some parts there, the rad support goes all the way across the front and two big holes in it for the fans. The rad support pieces on the sides attach to the big rad support that runs across the front.
The shortcomings of working over the net, if there I'd figure it out in 5 minutes but of course I'm not there. Nissan doesn't help with their extremely limited parts blowups, even the mechs working there have fits trying to tell where parts go as the pictures they show can wildly seem to indicate the wrong place to put them and not much help at all.
I apologize for not coming up with more than that, but I tried for at least 30 minutes. Normally I do much better than that.

Joined
·
6,365 Posts
Joined
·
2,622 Posts
I can say for sure that the part #62243 is a bracket that goes in center of car and super low, it holds the bottom of the bumper support to steady it. Typical of Nissan, it is located as nowhere close to where it actually goes.
I'm blind, I now see clearly, pic #1 post #1 is correct and that front piece as well as the outside support straps needs slight reworking to make them back usable, match to the first pic of the junkyard car in post #3 . OP is missing a lot of plastic there. Part #62672 (LH) bolts to the front of the red like in the pic on post #3 .
Somebody slap me with a dead fish............I took a short alzeimers vacation there.
Joined
·
105 Posts
Discussion Starter · #7 · (Edited)
I'm confused too...here's the front of a non-messed up coupe...what are you trying to get off?

http://i39.tinypic.com/166axl5.jpg

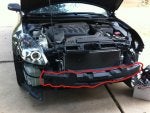
Sorry everyone for the confusion, I've attached two photos that I've drawn on to try and clear things up. On the picture provided by d0ugmac1 I circled in red both the bumper absorber and the front of the bumper reinforcement that needs removed.
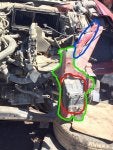
On the second photo you'll see in red the other piece of the bumper reinforcement that needs removed. I am after the piece outlined in green. That is what I'm referring to as the "bumper reinforcement mount" since I can't find any resources online that give the actual name. Mine is bent badly beyond bending back.
When I refer to the upper radiator support I'm talking about the piece circled in Blue. Not the main radiator support that the radiator is mounted inside of, just the upper piece of it.
You can see it at:
https://shop.advanceautoparts.com/p.../11754889-P?searchTerm=upper+radiator+support
My main problem is the piece in green. As of now I am unable to bend it back, if I do find something strong enough to bend it I believe it will crack and will probably never align correctly either. And even if I do get it off I'm not sure where I can get a replacement?
-
174 KB Views: 311
-
200.5 KB Views: 234
Joined
·
6,365 Posts
As far as I know that green part is welded to the unibody frame. To fix that, and I'm no autobody expert, you'll probably need to weld in a section from a front end clip--not even sure, at least up here, if that kind of repair would even pass inspection to be road-worthy again. Keep in mind that coupes are different than sedans, so you'll want to match metal as closely as you can.
Joined
·
2,622 Posts
X2, that is part of the unibody front frame section. Nissan likely sells it in a huge piece including the entire rail and weld on only.
If the green circled piece as in your OP first pic is the driver side then it is easily workable by anybody competent in moving metal back around to be proper shape and fit again. It WILL take some banging and heavy twisting to do it. I have brought back pieces much worse than that. Only if it is torn in the metal somewhere (there is a lower buckle you cannot see clearly that I am wondering about) would I consider removing it to weld on another. Of course the body shops cut things like that off all day now, the art of working metal is dying off just like other complicated you-have-to-think-about-it skills. I like to preserve the OEM weld job myself if possible, you get better welds like that.
When it comes to spot welds that hold some parts on you pick a drill bit just larger than the spot and drill it out to be nothing, doing all and the part falls right off. The drill bit MUST be an expensive one as you are cutting weld there, the metal gets quite hard as welding is a heat treating process too. Spot welds will eat a common hi-speed steel bit up in seconds.
Joined
·
105 Posts
Discussion Starter · #10 ·
I've been researching all sorts of different titles on YouTube lately and have found nothing that is quite what I'm looking for. After reading your replies yesterday I decided that rather than attempting to replace I would try heating it up with oxy-acetylene and using a come-along to pull it as straight as I can.
Then today I hop on YouTube, and this is on my front page:
This guy seems to have a very similar problem to me and was able to fix his. While I don't have the tools he has, and really don't want to spend hundreds of dollars to get them, I think it's something that is doable as long as I'm careful not to over stress the metal.
Joined
·
2,622 Posts
Well, overstressing the metal means tearing it. You can go anywhere short of that. The part may not be 100% straight like a new one, the issue is to get back to exact POINTS IN SPACE to locate other parts correctly that depended on the points in space being correct. You generally can get to within 1/8" and be fine. Start thinking in terms off angles and if the material were much easier to work, and then simply use more force to get what you need. My last hydraulic cylinder was a tree about 15 inches in diameter, I used car engine to yank against it and worked fine.
Bear in mind you sometimes have to dent or warp a good area to get a more difficult area bent back in place, then you have to go back and redo the area you messed up to get it back in too. That often happens to outer edges while you are getting the center right, then the outer edges are easy to fix without messing up other. Take care of bigger moves first then begin to detail smaller areas. Junkyard pics of a chassis that is straight right where you are not yet exposed so you can see it can be VERY helpful when deciding if you have a part shaped and situated right.
In reference to the link pic, I would myself remove the condenser and rad as sometimes things come loose suddenly and that condenser may still be saveable. I rebent one much worse than that one back straight and flat and it has sealed a/c pressures for 10 years now. Better to be down to the basic metal anyway to be able to easily see how out of square things are, the condenser and rad hide a lot there that cannot be seen.
Posted by: keniakeniakostylae0274291.blogspot.com
Source: https://www.nissanclub.com/threads/how-to-remove-bumper-reinforcement-mount-and-upper-radiator-support.517425/

Post a Comment for "2010 Altima Sedan Radiator Support Diagram"